In this tutorial, we will create a simple app that integrates with GitHub and lets us create issues for Freshdesk tickets. Along the way, we will look into the frequently used platform-features such as Request API, Data Storage, Notifications, OAuth, Installation Parameters, UI Modals/Dialogs, and so on.The features will come in handy when you create apps for our products.
⭐️What will we learn?
How to,
- Make API calls from our app and secure the calls by using OAuth
- Create a GitHub issue from Freshdesk
- Avoid duplication using Data Storage
- Display the issue, on our app by using Modals and Data storage APIs
Before we dive-in, ensure to,
- Switch to
level2directory. You can come out of thelevel1directory and switch to level2 using the following command
cd ../level2- Set up a trial Freshdesk account
- Set up a GitHub account
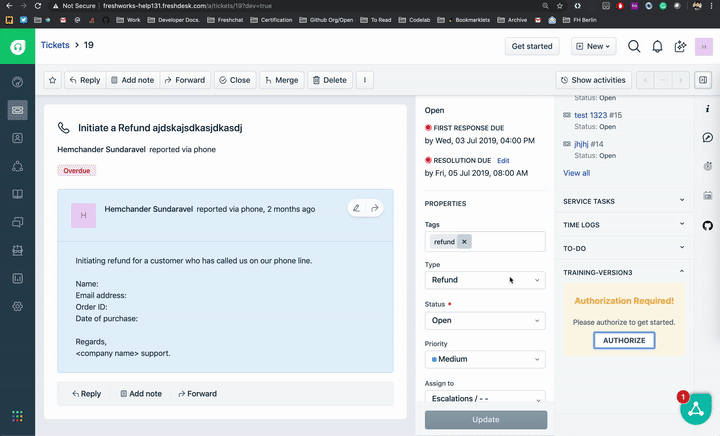
If you navigate to app/template.html, you'll notice that we have a simple UI built using Bootstrap v3.3 and containing the product (Freshdesk) stylesheet. The UI looks as follows:
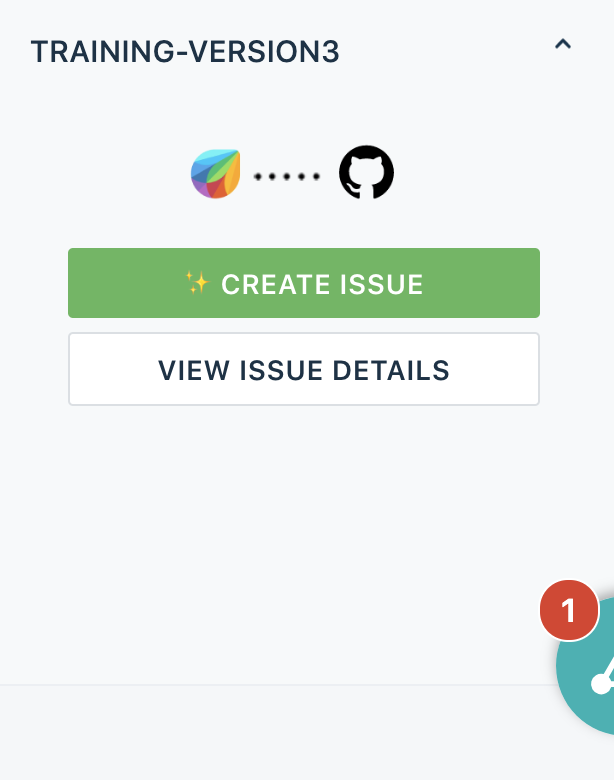
The Create Issue button enables us to create an issue and the View issue details button helps us to view the created issue. This is a simple sidebar app (there are other placeholders (Full page, background, CTI) in Freshdesk .
app/template.html
<html>

<head>
 <script src="https://ajax.googleapis.com/ajax/libs/jquery/3.2.0/jquery.min.js"></script>
 <script src="https://static.freshdev.io/fdk/2.0/assets/fresh_client.js"></script>
 <script src="app.js"></script>
 <link rel="stylesheet" type="text/css" href="https://static.freshdev.io/fdk/2.0/assets/freshdesk.css">
 <link rel="stylesheet" type="text/css" href="style.css">
</head>

<body>
 <div class="fw-widget-wrapper">
   <div class="row col-xs-12 col-xs-offset-0">
     <div class="banner">
       <img src="./resources/img/banner.png" width="175px"/>
     </div>
     <button id="createIssue" type="button" class="btn btn-success btn-block mr-1">
       <small>✨Create Issue</small>
     </button>
     <button id="viewIssue" class="btn btn-default btn-block mr-1">
       <small>View Issue Details</small>
     </button>
   </div>
 </div>
</body>

</html>
REST APIs enable communication between the app and GitHub. This is the case for any third-party communication from the app as well. The GitHub API documentation clearly specifies where (endpoint) and how to make the API call (headers, payload, and so on). Our app should adhere to the specification and provide payloads in the specified format.
To create an issue in GitHub, we must make an API call to the POST /repos/:owner/:repo/issues endpoint with the following payload attributes:
Attribute Name | Type | Description |
|
| Title of the issue. |
|
| Contents of the issue. |
|
| Milestone number to which the issue must be associated. Note: Only users with push access can set the milestone for new issues. Otherwise, the milestone is silently dropped. |
|
| Labels to associate with the issue. Note: Only users with push access can set labels for new issues. Otherwise, the Labels are silently dropped. |
|
| Logins for users who must be assigned to the issue. Note: Only users with push access can set assignees for new issues. Otherwise, assignees are silently dropped. |
Usually, in front-end apps, making API calls is a challenge especially when it is to be secured. To secure API calls and to solve other issues such as CORS, templating for keys/tokens, we make use of the Request API and iparams.
The following snippet shows the iparam definition in the config/iparams.json file:
{
 "github_repo": {
   "display_name": "Github Repo Name : ",
   "description": "Enter the Github Repository name Ex: githubhandle/reponame",
   "type": "text",
   "required": true,
   "secure": true
 },
  "freshdesk_api_key": {
    "display_name": "Freshdesk API key",
    "description": "Enter the Freshdesk API key. It can be found in the profile settings.",
    "type": "text",
    "required": true,
    "secure": true
  }
}
The Request API call from our app looks as follows. Make a note of how we made use of the iparam templating to substitute the repo name.
app/app.js
client.request.post(`https://api.github.com/repos/<%= iparam.github_repo %>/issues`, options)
    .then(function (data) {
      // TODO : Add try catch block
      response = JSON.parse(data.response);
      var ticketObj = { ticketID: ticketData.ticket.id, issueID: response.id, issueNumber: response.number };
      setData(ticketObj);
    })
    .catch(function (error) {
      console.error("error", error);
    });
Until now, we have seen the structure of the Request API and how it can be used with iparam templating, to make a call. If we use basic authentication or keys, we can make similar use of iparams in setting the header values (in the options object of the Request API - which we will see shortly). In our case, we want to secure the API calls by using OAuth; let's see how it can be done with the Request API with a short primer on OAuth.
Open Authorization (OAuth) is an open standard for delegated authorization . OAuth is commonly used as a way for users to grant websites or applications access to information on other websites, without giving away the passwords.

For more information on OAuth, refer our documentation..
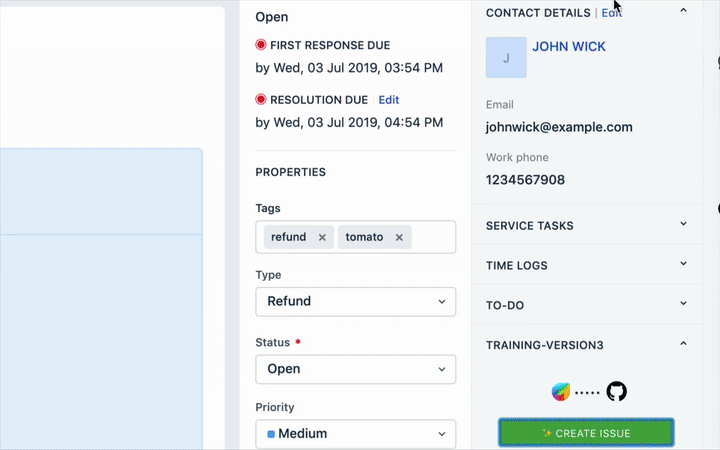
Let's proceed to create a GitHub app that would provide us the client_id and client_secret to enable OAuth in our app. When creating the app, ensure to provide the redirect URL for your app in the third-party developer portal (GitHub) with the following values:
- Local Testing:
http://localhost:10001/auth/callback - Production:
https://oauth.freshdev.io/auth/callback
After the app is created, obtain the client_id and client_secret values (Refer image below) and add them to the oauth_config.json file along with the authorization and token URLs. For more information, refer the GitHub developer docs.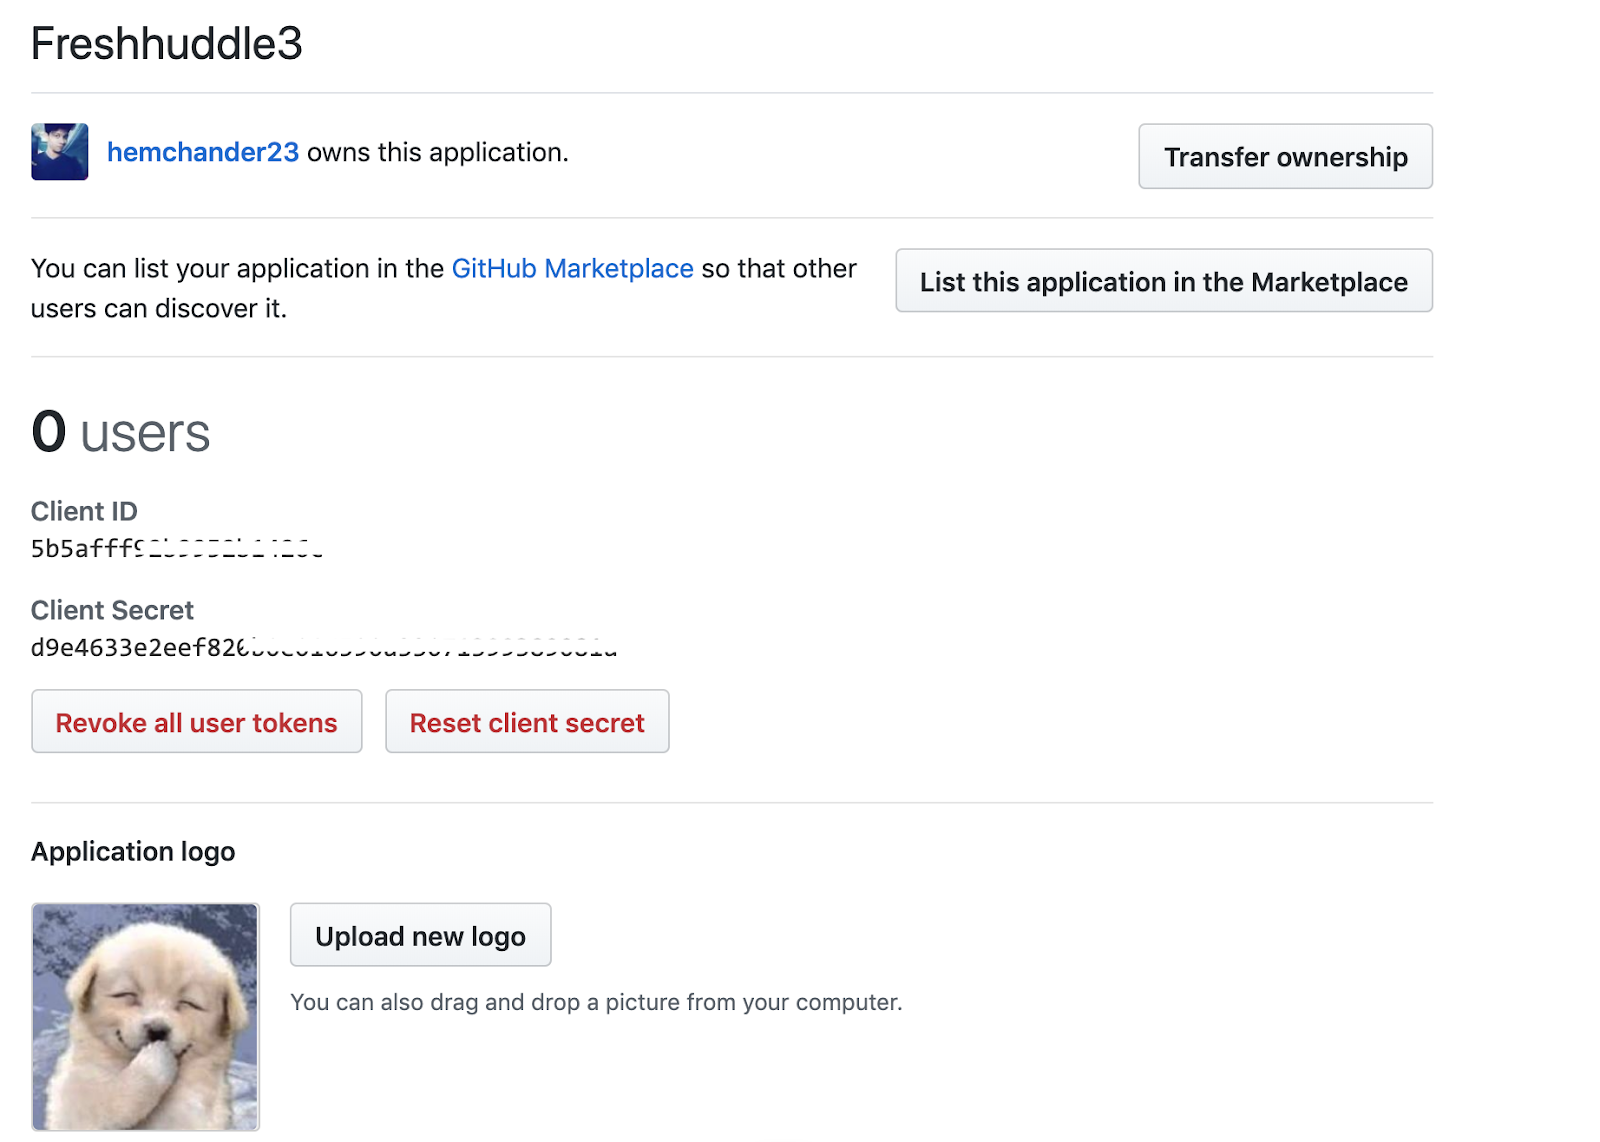
A sample oauth_config.json file is as follows:
config/oauth_config.json
{
 "client_id": "5b5ablababalbalbalbalbalb1426c",
 "client_secret": "d9e4633e2blabalbalbalbalbalbal33071399389081a",
 "authorize_url": "https://github.com/login/oauth/authorize",
 "token_url": "https://github.com/login/oauth/access_token",
 "options": {
   "scope": "repo"
 },
 "token_type": "account"
}
After the preceding steps are run, it is time to modify the options parameter of the Request API call.
Note: access_token is not an iparam and is automatically substituted after authorization.
app/app.js
/**
* Makes an API call to Github to create an issue from the ticket
* @param {object} ticketData Ticket data
*/
function createIssueHelper(ticketData) {
  var options = {
    headers: {
      "Authorization": 'token <%= access_token %>',
      "User-Agent": 'FreshHuddle Sample User Agent'
    },
    body: JSON.stringify({
      "title": ticketData.ticket.subject,
      "body": ticketData.ticket.description_text
    }),
    isOAuth: true
  };
  client.request.post(`https://api.github.com/repos/<%= iparam.github_repo %>/issues`, options)
    .then(function (data) {
      // TODO : Add try catch block
      response = JSON.parse(data.response);
      var ticketObj = { ticketID: ticketData.ticket.id, issueID: response.id, issueNumber: response.number };
      setData(ticketObj);
    })
    .catch(function (error) {
      console.error("error", error);
    })
}
After the necessary configurations, run the app by using the fdk run command. The following message requesting for authorization, is displayed.
After the app is approved, you will be redirected to the Create Issue page.
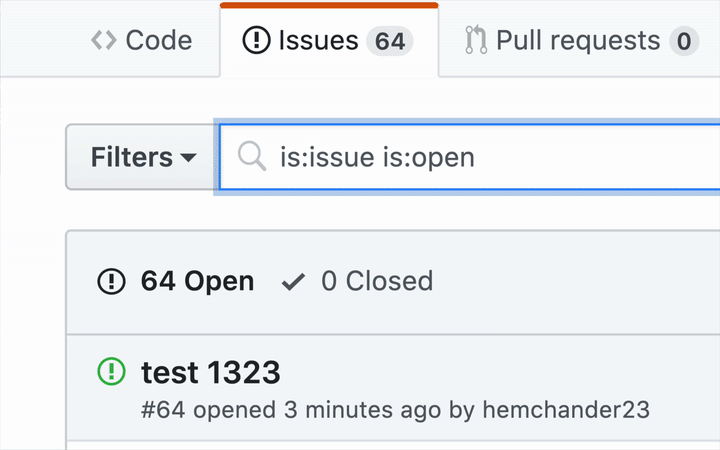
Now that we are able to authenticate with GitHub, we will see how we can create an issue in GitHub.
The createIssueHelper() method lets us create an issue in GitHub, based on the ticket data. The following is a preview of how the results look. The warning displayed indicates that there is another feature used in the app.
A corresponding GitHub issue is created in the repo that is specified in the iparams.json file.
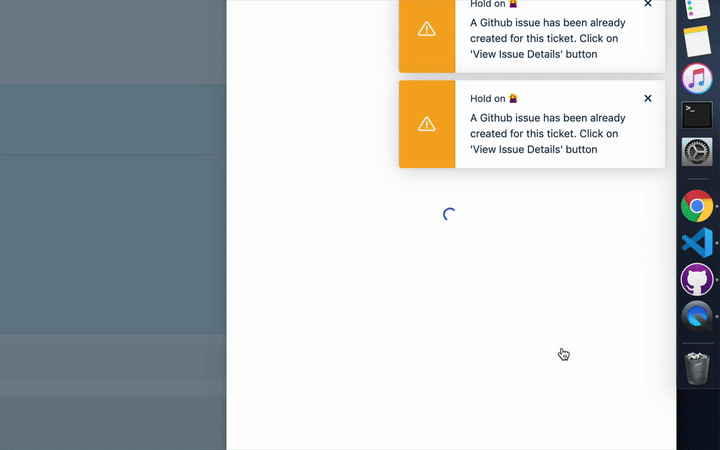
As evident from the title, we might run into a situation where we may create multiple issues by pressing the Create Issue button. To avoid duplicates, we can make use of the Data Storage feature in our app.
A simple method is to maintain a record for a ticket, if an issue is successfully created. When the next issue is to be created, a check is run to verify if there's a record that already exists. If it exists, the issue is not created.
Data storage allows us to achieve two things at the same time: avoid duplication and cache or fetch the previously persisted issue details in an instant.
app/app.js
/**
* Create a Github Issue
*/
function createIssue() {
console.log("Proceeding to create issue from the ticket");
getTicketDetails(function (ticketData) {
console.log(ticketData);
checkAndCreateIssue(
ticketData.ticket.id,
function () {
// The record already exists - indicates it is already associated with Github issue
showNotification('warning', 'Hold on 🙅🏻♂️', 'A Github issue has been already created for this ticket. Click on \'View Issue Details\' button');
},
function (error) {
//404 - Indicates that the record is not found in the data storage
if (error.status === 404) {
createIssueHelper(ticketData);
}
})
}, function (error) {
console.error("Error occurred while fetching ticket details", error);
});
}/**
* Store Github issue data using data storage API
* @param {array} data Issue array to be set in data storage
*/
function setData(data) {
var dbKey = String(`fdTicket:${data.ticketID}`).substr(0, 30);
var dbKey2 = String(`gitIssue:${data.issueNumber}`).substr(0, 30);
Promise.all([client.db.set(dbKey, { issue_data: data }), client.db.set(dbKey2, { issue_data: data })]).then(function () {
showNotification('success', 'Yay 🎉', 'A Github issue is successfully created for this ticket')
}).catch(function (error) {
console.error("Unable to persist data : ", error);
});
}You can use Interface APIs to trigger user interface actions on a page. With these APIs, an app can control the visibility of ticket properties, hide or disable buttons, and show dialog boxes and notifications.
For our app, we will make use of Modals to show the ticket details.
/**
*  Function to View issue in the modal, Passes ticket as an object to the modal, can be fetched in the modal using Instance API
*/
function viewIssue() {
  getTicketDetails(function (data) {
    client.interface.trigger("showModal", {
      title: "Github Issue Details",
      template: "./modal/modal.html",
      data: data.ticket
    });
  }, function (error) {
    console.error(error);
  });
}
The modal.html file contains the ticket details. Modal.js is the javascript file associated with it.
- From the modal.html file, obtain the issue number associated with a ticket.
- Use the Request API and make a GET call to GitHub.
- To display the ticket details, set the HTML content as follows:
/**
* Function to fecth issue from github, authorization is done using Oauth
* @param {string} issueID  Issue number to query specific  ticket from github
*/
function fetchIssue(issueID) {
 var options = {
   headers: {
     Authorization: 'token <%= access_token %>',
     'User-Agent': 'FreshHuddle Sample User Agent'
   },
   isOAuth: true
 };
 client.request.get(`https://api.github.com/repos/<%= iparam.github_repo %>/issues/${issueID}`, options)
   .then(function (data) {
     try {
       data = JSON.parse(data.response);
       var html = '';
       html = `<h3> Issue title : ${data.title} </h3>
               <p>Description : ${data.body}</p>
               <p> Issue Number : ${data.number}</p>
               <p>Issue ID ; ${data.id}</p>
               <p> Issue Status : ${data.state}</p>`;
       $('#modal').append(html);
     } catch (error) {
       console.error("Error while attempting to show issue", error);
     }
   })
   .catch(function (error) {
     console.error("error", error);
   });
}
If there's no issue associated with the ticket, the data storage APIs throw a 404 error status; we can display an appropriate message for the error.
/**
* Retrieve the issue from data storage
* @param {Number} ticketID Ticket ID
* @param {function} callback Callback function
*/
function getIssue(ticketID,callback) {
 var dbKey = String(`fdTicket:${ticketID}`).substr(0, 30);
 client.db.get(dbKey)
   .then(callback)
   .catch(function (error) {
     //404 - Indicates that the record is not found in the data storage
     if (error.status === 404) {
       console.error("No issue found for ticket", error);
       var html = '';
       html = `<div class="alert alert-warning" role="alert">
                 <img src="https://media.tenor.com/images/a48310348e788561dc238b6db1451264/tenor.gif" width="120px"/>
                 <hr>
                 Seems like there's no issue associated with this ticket. Please create one using 'Create Issue' button
               </div>`;
       $('#modal').append(html);
     }
   })
}
We learned to
- Create and configure an OAuth client into our app,
- Made secure API requests using Request APIs and the OAuth access token,
- Remembered state information using data storage,
- Learned to display notification from the app and
- Handed off control from the main instance of an app to a modal launched by the app.
What's next ?

(Serverless technique,before it got mainstream) - Wimpy, Popeye